Tuesday, September 22, 2015

How to get WDS PXE boot on Windows Server 2012 R2 to work on VMWare ESXi 6

After struggling with getting Windows Deployment Services to work on VMWare ESXi 6, I thought I should share a simple tip.

A virtual client doing PXE boot on ESXi 6 (or 5.5) on a standard default installed WDS on Windows Server 2012 R2 does not work out of the box. You have to do some small magic in order for this to work.

Here is what happens with VM that tries to network boot from a WDS server using the standard boot.vim that is included in the Windows 2012 R2 ISO/DVD:
Error while obtaining an IP address from the DHCP server

As you see, the VM does not get an IP from the DHCP server, although it clearly used to have an IP otherwise you couldn't get so far. So the VM does a network boot (PXE with F12), and then it fails.
When you are doing this on a VM running on ESXi 6 (or 5.5) and you are using the VMXNET3 nic on the VM, this is failing. The reason is that the driver for VMXNET3 is not included. If you setup your VM with E1000 or E1000E nic, this is not a problem as the driver for those nic's are included in the default boot.vim boot image.

So how to add the driver?
This is very simple, but takes some steps to perform.
1. First you need to find a VM with VMWare Tools installed. In my case, the WDS server is a Windows 2012 R2 server running as a VM.
2. Second, you need to add the VMXNET3 driver to a package group, which you already should have created. I just copied all the drivers from C:\Windows\System32\DriverStore from my WDS server for a start. And that is fine, but VMXNET3 is not included there. So right click your Drivers folder in the console and choose "Add Driver Package...":


3. Just browse to your C:\Program Files\Common Files\VMWare\drivers\vmxnet3 and choose the vmxnet3ndis6.inf file and click Next 2 times:

4. In the end, choose to add it to your driver group of choice. 


5. Then you need to add the driver for VMXNET3 to the boot image. Go into the WDS console, find your boot image and right-click, click "Add drivers packages to image...":

6. Click Next.
7. On this step, click the "Search for package" button:

8. Somewhere in the bottom you should find vmxnet3ndis6[x64]. Just unselect all the others and choose only the vmxnet3ndist6 driver package. It's a bad idea to add unnecessary drivers to the boot image, adding all drivers from this screen will cause the PXE boot process to go into a BSOD.

9. Click Next 2 times and you are done!

Now you can PXE boot your VM without problems getting DHCP.

Monday, April 13, 2015

Direct Access - Connecting hangs forever

For those who struggle with the problem:

Sometimes when a Windows8 client starts to connect to DirectAccess from the outside, you notice that the GUI show "Connecting" and will never connect.


But if you test to connect to your internal network resources, you'll notice that you indeed can connect to those internal resources. How come?

There are most likely 2 causes for this:
The icon you see, is actually the DCA (DirectAccess Connectivity Assistant) that is now built-in in Windows 8 and later. On Windows 7, you had to manually install it or deploy it with SCCM.

And DCA is not really needed, unless you need to support OTP on Windows7. You could do without, but of course that makes troubleshooting the clients much harder.

Alright, so DA is working, DCA is not.

Let us check what the DCA is checking. As the name indicates, it is purely an cosmetic connectivity check, unless you are using OTP. On of the things the DA wizard do when you setup DA, is to specify in Step 1 what DCA should check for.
And if you notice this screen:


You would see that the DA wizard adds directaccess-WebProbeHost.yourinternaldomain.local and creates an A record in DNS for this. This points to the same IP as your webprobe addresse (which is NOT your NLS server).

So if your Win8 client hangs forever connection to DA, it means that one of those tests here are failing.

In one case, a customer of mine had actually shutdown the DA server and the IIS server hosting the webprobe site for an extended period due to some internal maintenance. In that meant more then 7 days, which is the default scavenging interval if you have enabled scavenging in Windows Server 2008/2012. And the directaccess-WebProbeHost record has a lower TTL then this. So it meant that the A record was automatically deleted.

I just manually created a static A record in DNS for directaccess-WebProbeHost, so I made sure that it will never happen again.

Another reason, might be if you have enabled ELB with BIG-IP/Kemp or something similar. See the excellent blog of Richard Hicks for this scenario. http://directaccess.richardhicks.com/2014/08/12/directaccess-clients-in-connecting-state-when-using-external-load-balancer/

Thursday, August 7, 2014

A note about running nested Hyper-V VM's on ESXi 5.5

Today I finally made it possible to run Windows 2012 R2 Hyper-V as a VM running on ESXi 5.5 (nested VM's).
After extensive trial and error, I finaly found the solution that might be useful for you as well.

Background:
As most people know after a little googling and reading, Hyper-V on Windows 2012 R2 requires a SLAT capable CPU, if not Windows refuses to add the Hyper-V role. There are lots of guides and blogs about this, but none of them worked for me. So I did the tricks on Derek Seaman's excellent blog (http://www.derekseaman.com/2014/06/nesting-hyper-v-2012-r2-esxi-5-5.html) but unfortunately no success in my case.

I got the famous "Hyper-V cannot be installed:  The processor does not have the required virtualization capabilities."


My solution:


1. Make sure you add the following string vhv.allow = "TRUE"  to /etc/vmware/config of your ESXi 5.5 host. Note that the quotion mark have to be exactly as the same in the config file (I found out that in my first try, the marks where upside-down and the vSphere Client refused to let me "add to inventory" the VMX file, until I changed it).


2. Remove the Hyper-V VM from the inventory of your vCenter/ESXi host.

3. Download the corresponding VMX file of your Hyper-V VM in vSphere to your computer (HyperV-1 in my case):

4. Edit this file with Wordpad, NOT Notepad!! Otherwise you will loose some special formatting that Notepad can't cope with. Add the following 2 lines somewhere in your VMX file:

vhv.enable = "normal"
hypervisor.cpuid.v0 = "FALSE"

+ change the line of guestOS = "windows8svr-64" into guestOS = "windowsHyperVGuest"

4. Upload the file back to the datastore and folder where your VM are located and register it (right click the VMX file and choose "Add to Inventory".

5. Now update the the VM to HW version 10 (yes I now it sucks, since you cannot edit the VM with the vSphere Client anymore).

6. Open your web vSphere client (that is, your browser) and logon to your vCenter server (yes you need vCenter, since you cannot edit ESXi 5.5 hosts with the vSphere Client, only with the web client that of course requires vCenter server....). Now edit your VM once more, but this time you will see a checkbox if you expand the CPU section that says "Expose hardware assisted virtualization to the guest OS". And here is the magic!
Enable it and you are good to go.

The final step was what solved the problem for me.

More background:
My lab enviroment for this is pretty cheap and simple, a gigabyte h67a-ud3h-b3 mainboard, with 32 GB RAM and Intel Core i5 2500 which supports SLAT/EPT. I also noted that if I ran the coreinfo.exe (from Technet) on the Hyper-V VM, it showed that everything was fine and that EPT was enabled, but Windows still refused to add the Hyper-V role, claiming my processor did not support some capabilities.

After reading a little, I found out that it might have something to with my BIOS version (of course I updated it), then it could be that some Gigabyte mainboards need to disable USB 3.0 ports in order for EPT to work, so I tried that also of course.

And last tip: You need to enable Promiscuous mode on your vSwitch in order for the nested VM running on Hyper-V to be able to connect to your LAN (and internet). 

Wednesday, May 2, 2012

The Outlook 2010 and shared mailbox email notification problem

Now, this is a common problem for all who is using shared Exchange 2010 mailboxes with Outlook 2010, and possible other combinations as well.

The problem is that if you are given access to a shared mailbox, whenever there is a new email, you don't get the same notification when a new email arrives, as you do in your primary email account in Outlook.

According to Microsoft, this is by design. And there is no way to control it, even if you add special rules to Outlook to display email alerts, it simply does not show up on incoming email.

Here is a possible solution for this. Be aware that this is maybe not suitable for your environment, but it works though.

The standard way (and officially supported):
The Exchange admin has to give you full mailbox access to the shared mailbox with EMC or powershell commands. In Exchange 2010 SP2, there is an auto-mapping feature, that automatically adds the shared mailbox to Outlook when you start Outlook. So no longer need for the end user to manually add the mailbox, as before.
Great, only problem is that you never will never receive email alerts or notification when a new email arrives in the shared mailbox.

The other way (and not officially supported):

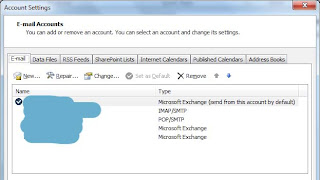
Instead of giving the end-user full access in Exchange ECM or powershell, give the user the account information (email address+username) and password for the shared mailbox. In Outlook 2010, go to File -> Account settings and click New.. to create a new Exchange account. In Outlook 2007 it was not supported to have more than one Exchange account, but in Outlook 2010 this is supported. It should take only a few seconds and then then new shared mailbox is ready. Restart Outlook. First time the user logs in, the user will asked to enter credentials for the shared mailbox. Enter it in the form DOMAIN\username + password. After that the user will not be asked for credentials again. That is, if you set the account for the shared mailbox to "Password never expires" in AD. If you don't set that property, the user will be asked again for credential after some time each time Outlook is started.

As you see in my example, I have added 2 extra shared mailboxes and they show up  as separate Exchange accounts.

But security, hello?
First of all, this is a little dirty trick in order to get the email notification. At first you might think its a bad idea to give the password for the shared mailbox for several users in your AD. Not really if you ask me, they will have full access to the mailbox anyway if you give them "Full Access" permission in Exchange. Secondly, if you restrict the account to deny login to workstations and servers, then there is no simple way to exploit the account. If you also put "Password never expires" and "User cannot change password", there is no way the users can change the password and they also will not get prompted for the password again. If you are a little paranoid, you can enter the password yourself for the user first time after the account is added to Outlook, so the users will never know the password.


Tuesday, April 17, 2012

A lesson learned about RAM...

One of my customers has a simple whitebox ESXi 5 server, with only local SATA disks. A whitebox VMWare ESXi 5 server, is just a more or less standard PC, with industry standard PC components. Nothing fancy, except that you need a modern CPU with virtual hardware support and a decent network card (not standard Realtek NIC's that you typically find in a standard PC, a dedicated NIC is often needed).

Anyway, the customer has this ESXi 5 server running around 9 VM's, and with a total of 32 GB. For a month ago, some VM's randomly got hit by the typical  BlueScreen (STOP error) on Windows VM's. The STOP error indicated driver errors, and memory errors. I was first thinking about something wrong with the disk, maybe some read errors?

Anyway, the problems disappeared after some days, thinking everything is just in perfect order. And then it started again.

This time, I suspected the RAM modules.

So I downloaded MemTest+ (http://www.memtest.org/) and booted the server. And boy, that was a lot errors. I counted over 6000 errors after 2 pass with all the modules installed. The errors show up pretty quickly in the test, so in my case, I did not care for testing for days, as some other people do.

After removing and testing one by one RAM module, I found a faulty module, RMA'ed to the seller and now we are back on track.

Investigation:
Now I started to wonder how can this happen, as it worked fine for almost a year. RAM errors just don't often happen by it self in a 24/7 running server, usually RAM errors are present from the factory. Then I found out that my customer for almost 1 year was only running 3 small windows servers, with a total RAM usage of around 5 GB. A little bit overkill with 32 GB RAM of course, but the customer added 6 new VM's just prior to when the problem started. And then the total RAM usage was around 27 GB.

The faulty RAM was in slot 2 (starting from slot 0), so I guess that the faulty RAM module where hardly used or at least the faulty registers where not heavily used. I am not sure how ESXi are using the RAM modules, but I presume that it is more or less random. And with only 5 GB of 32 GB in use, there was a low chance to hit the faulty registers.

Lesson learned:
Always do a Memtest before you put a server in production, even it it's a costly HP/DELL/IBM server with lots of fancy hardware. Especially if it is a ESXi server, running many VM's.

A note about "real" server RAM:
Real servers from a well known company always use ECC RAM, versus Non-ECC RAM for standard PC's. The price tag is a lot higher on ECC-RAM, but in the other hand, one of the nice things that ECC is doing, is correcting on the fly RAM errors that I experienced. Of course it cannot handle all types of errors, but it definitively decreases the chances of your server going crazy. 

Thursday, April 12, 2012

How to use OS customization for CentOS 6 in vCenter 5

Do you have a VMWare vCenter 5 Server with a CentOS 6 template, just to discover that you cannot use OS customizations on it, like you can with Ubuntu and most Windows OS's?

This is the solution for you.
(warning: there is an easier way to do it, look at the comments section)

Background:
If you don't know what I am talking about, the goal is this:
You have spent a lot of time of creating a great VM, with OS and maybe some applications as well, to be used as a master copy that you would like your new VM's to be a copy of. That stuff works great in Windows OS's and a few Linux OS's (like Ubuntu and RedHat), but not with CentOS. CentOS is based on RedHat and is very popular in the IT hosting industry.

Now the problem is that you could make it work in CentOS 5 with a little manual editing, but kernel changes in CentOS 6 broke that old solution.
Note: This step-by-step guide is not supported by VMWare or is support, so use it at your own risk!
This only works in vCenter 5, if you want to achieve the same in vCenter 4.1, you have to change the OS setting on the VM to RedHat.

What happens when you clone a Template in vCenter on a template with CentOS 6 ?
The answer is that the device manager (udev) in the kernel 2.6.13 and above remembers the NIC settings from the template, so you end up with 2 NIC's in your cloned VM. Note that you have to edit the VM template to be a RedHat server (not CentOS!) in order to use a Guest Customization in vCenter, otherwise you will receive an error message in vCenter. (hint: convert the template to a VM and than edit settings to change OS type)

Here is an example:


[root@centostemplate ~]# cat /etc/udev/rules.d/70-persistent-net.rules
# This file was automatically generated by the /lib/udev/write_net_rules
# program, run by the persistent-net-generator.rules rules file.
#
# You can modify it, as long as you keep each rule on a single
# line, and change only the value of the NAME= key.
# PCI device 0x15ad:0x07b0 (vmxnet3) (custom name provided by external tool)
SUBSYSTEM=="net", ACTION=="add", DRIVERS=="?*", ATTR{address}=="00:50:56:42:02:2f", ATTR{type}=="1", KERNEL=="eth*", NAME="eth0"
# PCI device 0x15ad:0x07b0 (vmxnet3)
SUBSYSTEM=="net", ACTION=="add", DRIVERS=="?*", ATTR{address}=="00:50:56:42:ef:34", ATTR{type}=="1", KERNEL=="eth*", NAME="eth1"

What you end up with, is 2 nic's on the clones VM, eth0 being a clone of the original nic and eth1 being the new nic in your VM.

This is problematic as eht0 is not shown at all if you do a ifconfig, it will only show eth1 with DHCP and even if you set a static IP (in the Customization Wizard), it will not work.

Now for the solution:
Remove the section of eth0 on this file /etc/udev/rules.d/70-persistent-net.rules
Example (remove everything in red):


# This file was automatically generated by the /lib/udev/write_net_rules
# program, run by the persistent-net-generator.rules rules file.
#
# You can modify it, as long as you keep each rule on a single
# line, and change only the value of the NAME= key.
# PCI device 0x15ad:0x07b0 (vmxnet3) (custom name provided by external tool)
SUBSYSTEM=="net", ACTION=="add", DRIVERS=="?*", ATTR{address}=="00:50:56:42:02:2f", ATTR{type}=="1", KERNEL=="eth*", NAME="eth0"
# PCI device 0x15ad:0x07b0 (vmxnet3)
SUBSYSTEM=="net", ACTION=="add", DRIVERS=="?*", ATTR{address}=="00:50:56:42:ef:34", ATTR{type}=="1", KERNEL=="eth*", NAME="eth1"


And than change NAME from eth1 to eth0.

Now you have a working nic, but with wrong config.

To correct the config:

[root@centostemplate ~]# cat /etc/sysconfig/network-scripts/ifcfg-eth0
DEVICE="eth0"
BOOTPROTO="static"
HWADDR="00:50:56:42:ef:34"
IPV6INIT="no"
IPV6_AUTOCONF="no"
NM_CONTROLLED="no"
ONBOOT="yes"
IPADDR="192.168.10.125"
NETMASK="255.255.255.0"
NETWORK="192.168.10.0"
BROADCAST="192.168.10.255"


Note that you have to edit the HWADDR to match the new nic's mac address. If you are unsure what is the correct mac address, just edit the VM and look on the network card mac settings.

Reboot the server and your done!
That's it, maybe a little extra work, but on the other hand, now you can use Guest Customizations on vCenter, which saves a lot of work hours!

Credit to http://aaronwalrath.wordpress.com/2011/02/26/cloned-red-hatcentosscientific-linux-virtual-machines-and-device-eth0-does-not-seem-to-be-present-message/ for getting me in the rightt direction!